 Oqiva
User guide
Everything you need to use Oqiva, section by section: boards, the canvas, mind maps, flowcharts, sharing, comments and more. Use the list on the left to jump around.
Signing in and your first board
Oqiva lives at an address your organisation chose, which ends in /oqiva. You do not need a separate account: you sign in with the same name and password you use for the rest of your Frappe site.
The welcome page
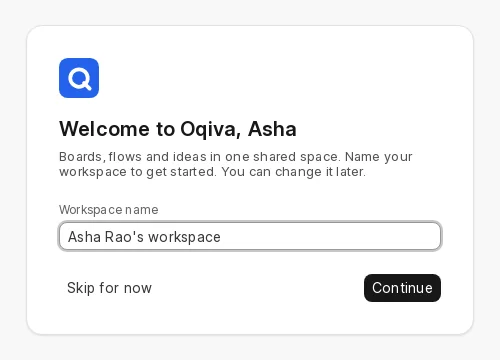
The very first time, a short welcome page asks what to call your personal workspace. It starts as “Your name’s workspace” and you can change it later. Choose Continue (or Skip for now) and you land on your home page.
You see this page once. It will not come back on another computer or after you clear your browser.
Your first board in a minute
Choose New board
The black button at the top right of the home page makes a blank board and opens it.
Add something
Press R and drag on the board to draw a rectangle, then double-click it and type. That is the whole idea; the rest of this guide shows what else you can do.
Name it
Click the board’s title at the top and type a name. Everything saves by itself, and the top bar says Saved when it has.
Finding your way around
The home page is where you start and where you come back to. A sidebar on the left lists where things are, and a bar across the top holds the actions you use most. Every number on the pictures below matches the list under it.
The sidebar
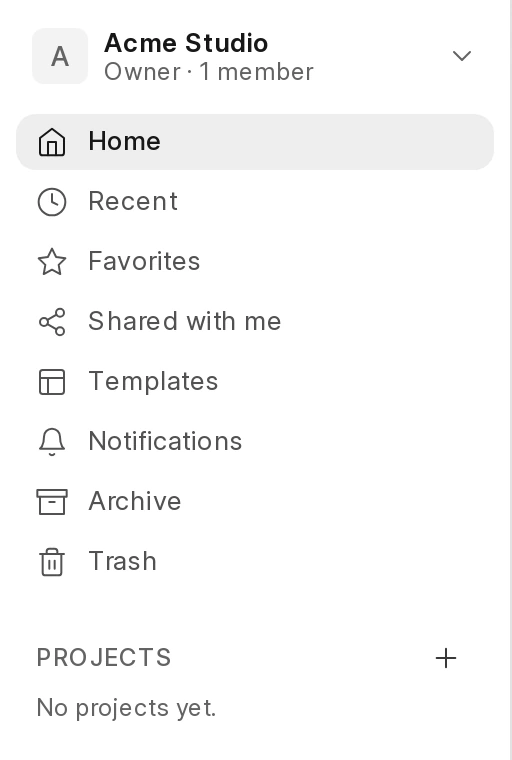
- Workspace switcher. Shows the workspace you are in and your role. Open it to change workspace or to make a new one.
- Home. The boards you worked on most recently in this workspace.
- Recent. Everything you have opened lately.
- Favorites. Boards you starred. The star appears when you point at a board.
- Shared with me. Boards other people gave you access to, from any workspace.
- Templates. The template gallery, with search and categories.
- Notifications. Mentions and replies. The same list as the bell on a board.
- Archive. Boards you put away without deleting them.
- Trash. Deleted boards, kept for 30 days by default, where you can restore them or delete them for good.
- Projects. Folders for boards. Use the plus to add one.
The top bar

- Search. Finds boards by name and comments by their text. Press Ctrl + K from anywhere.
- From template. Opens the template gallery.
- Import. Brings in a board file (
.oqiva.json) as a new board. - New board. A blank board in the current workspace.
On a phone or a narrow window the sidebar becomes a drawer behind a menu button, and the top bar’s buttons tuck into a menu.
Workspaces and projects
A workspace is the space for a team, a client or just you. Everyone has a personal workspace, and you can belong to as many others as you are invited to. Inside a workspace, projects group related boards, like folders. A board can also sit at the top level with no project.
| Role in a workspace | What it means |
|---|---|
| Owner | Created the workspace. Can do everything, including deleting it. |
| Admin | Manages members and can archive or delete any board in the workspace. |
| Member | Makes boards and projects, shares boards, and can archive or delete the boards they made. |
| Guest | Sees only the boards that were shared with them directly. |
Making and organising boards
There are three ways to get a new board, and a handful of things you can do with it once it exists.
Three ways to start
- New board gives you an empty infinite canvas.
- From template (or Templates in the sidebar) opens a gallery of about forty ready-made boards. Use the search box or the category buttons, then choose Use template. You get your own copy, and the original is never changed.
- Import reads a board file (
.oqiva.json) saved from Oqiva earlier, here or on another site, and makes it a new board. Pictures are not carried in the file.
Looking after a board
Point at a board on the home page and two small buttons appear on its card: a star to make it a favorite, and a … menu.
- Rename, or click the title while you are inside the board.
- Duplicate makes a copy to try ideas on.
- Move puts it into a project, or back at the top level.
- Archive hides it without deleting it. It stays in Archive.
- Move to Trash deletes it, but not yet: it stays in Trash for 30 days (your administrator can change that) and can be restored with one click. Delete permanently in Trash removes it for good, and asks you to type its name first.
Finding a board
Press Ctrl + K and type. Search looks at board names and at the text of comments, and only ever shows what you are allowed to see. Switch between cards and a list with the two small buttons at the right of the board list.
The canvas and its toolbar
A board is an endless canvas. Everything you add goes on it, and the toolbar floating at the bottom is how you add it. Here is every button, left to right.

- Select V. Pick, move, resize and rotate things. This is the tool you are in most of the time.
- Hand H. Drag the board around. Holding Space does the same for as long as you hold it.
- Draw. A menu with the pen, highlighter, eraser and laser pointer, and the board’s hand-drawn look.
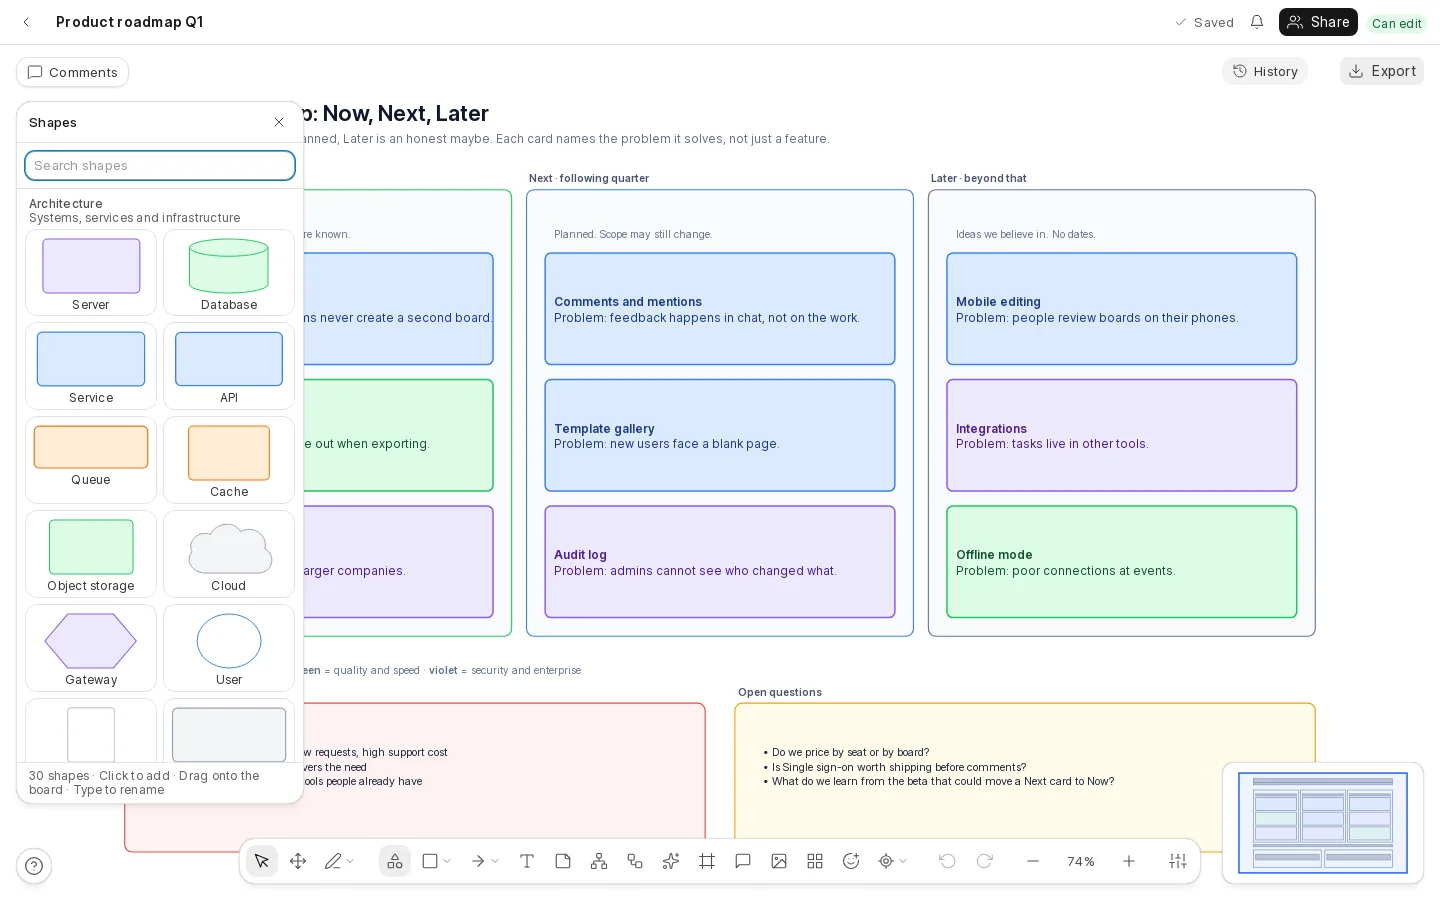
- Shape library Shift + S. Ready-made shapes for architecture, flowcharts, wireframes and more, with a search box.
- Shapes. Rectangle, ellipse, triangle, diamond and other basic shapes. The last one you used is remembered.
- Lines and arrows L. Straight, elbow and curved connectors with your choice of arrowheads.
- Text box T. Free text with no shape around it.
- Sticky note N. A coloured note. Press Tab while writing one to start the next one beside it.
- New mind map M. Starts a mind map in the middle of what you are looking at.
- New flowchart Shift + F. Starts a flowchart with a Start step and a first step.
- Create with AI. Describe a diagram and have it drawn. It tells you plainly if your administrator has not turned it on.
- Frame F. A named section of the board. Moving a frame carries what is inside it.
- Comment C. Click a shape, or any place, to leave a comment there.
- Add picture. Upload a PNG, JPEG, GIF or WebP. You can also paste a picture from your clipboard.
- Table. Choose how many rows and columns; double-click a cell to type in it.
- Icons and emoji. A picker for icons and emoji to place on the board.
- Jump to a section. Lists the frames on the board so you can go straight to one.
- Undo. Takes back your own last step. Ctrl + Z.
- Redo. Puts it back. Ctrl + Shift + Z.
- Zoom out. Also Ctrl + -, or Ctrl and the mouse wheel.
- Zoom level. Shows the current zoom. Open it to fit everything on screen, set a zoom, or show or hide the small map.
- Zoom in. Also Ctrl + +.
- Canvas settings. Infinite canvas or a fixed page size, background colour, grid, and hand-drawn outlines for the whole board.
Moving around
- Pan: scroll, or drag with the Hand tool, or hold Space and drag.
- Zoom: hold Ctrl and scroll to zoom at the pointer, use the plus and minus buttons, or pinch on a touch screen. Shift + 1 fits everything on screen, and Ctrl + 0 goes back to 100%.
- The small map in the bottom corner shows the whole board and where you are. Click it to jump. Hide it from the zoom menu if you do not want it.
The shape library
Press Shift + S to open the library. Click a shape to add it near the middle of your view, or drag it exactly where you want it. Type in the search box to find one by name.
Shapes, text, lines and pictures
Click anything to select it. A bar appears above the board with exactly the things you can change about it, and the bar differs by what you picked. For an ordinary shape it looks like this:

- Shape. Turn it into a different shape without losing its text.
- Link. Attach a web address or another board to it. People can click through.
- Comment. Start a comment pinned to this shape.
- Arrange. Bring to front or forward, send backward or to back, group and ungroup.
- Align. Line up several shapes (left, centre, right, top, middle, bottom), space them evenly, make them the same size or swap places.
- Rotate and flip. Quarter turns and mirror images.
- Fill. The colour inside the shape.
- Border. Colour, thickness and style of the outline.
- Text. Font size, bold, italic, underline, colour and alignment.
- Hand-drawn style. A sketchy outline for this shape only.
- Transparency. How see-through it is.
- Corner radius. Sharp or rounded corners.
- Copy format. Pick up this shape’s look, then click another shape to give it the same.
Putting things on the board
- Shapes: choose one and drag on the board for the size you want, or just click for a standard size. R is a rectangle and O an ellipse.
- Text inside a shape: double-click it, or select it and press Enter. Press Esc to finish. Text grows the shape when it needs room.
- Text on its own: the Text box tool, then click where it should go.
- Sticky notes: N, then click. Notes come in several colours.
- Pictures: the picture button, or paste one. Pictures are stored privately with the board, so only people who can see the board can see them.
- Tables: pick a size, then double-click a cell to type. Tab moves to the next cell.
Selecting, moving, resizing
- Drag a shape to move it. Coloured guide lines appear to help you line it up with others; hold Alt to move freely.
- Drag the handles on the corners and sides to resize, and the round handle above it to rotate.
- Drag on an empty part of the board to draw a selection box round several things, or hold Shift and click to add them one by one. Ctrl + A selects everything.
- Arrow keys nudge by one step, or ten with Shift. Ctrl + D duplicates.
Lines and arrows
Choose the line tool (L) and drag from one shape to another. The ends stick: move either shape and the line follows. There is a shortcut too: point at a shape and small arrows appear around it. Click one and Oqiva adds a connected copy in that direction.
- Choose straight, elbow or curved lines, and the arrowheads at each end, from the line menu.
- Double-click a line to give it a label.
- Drag an end to move it or attach it to a different shape.
Frames and sections
A frame is a named rectangle behind other things, for dividing a board into sections. Double-click its name to rename it. When you move a frame, whatever sits inside it moves too. Jump to a section on the toolbar lists all frames.
Mind maps
A mind map in Oqiva is a real tree, not a pile of shapes with lines: it arranges itself, and each node knows its parent. That makes it quick to grow and easy to rearrange.
Building one
Start the map
Press M (or use the mind map button). A central idea appears in the middle of your view, ready for you to type over.
Grow it from the keyboard
Tab adds a child. Enter adds a sibling after the selected node. Shift + Tab moves a node up a level. Use the arrow keys to walk through the tree, and Alt + Up or Down to reorder.
Fold what you are not discussing
Press - to collapse a node (a small badge shows how many nodes are hidden) and + to open it again.
The mind map bar
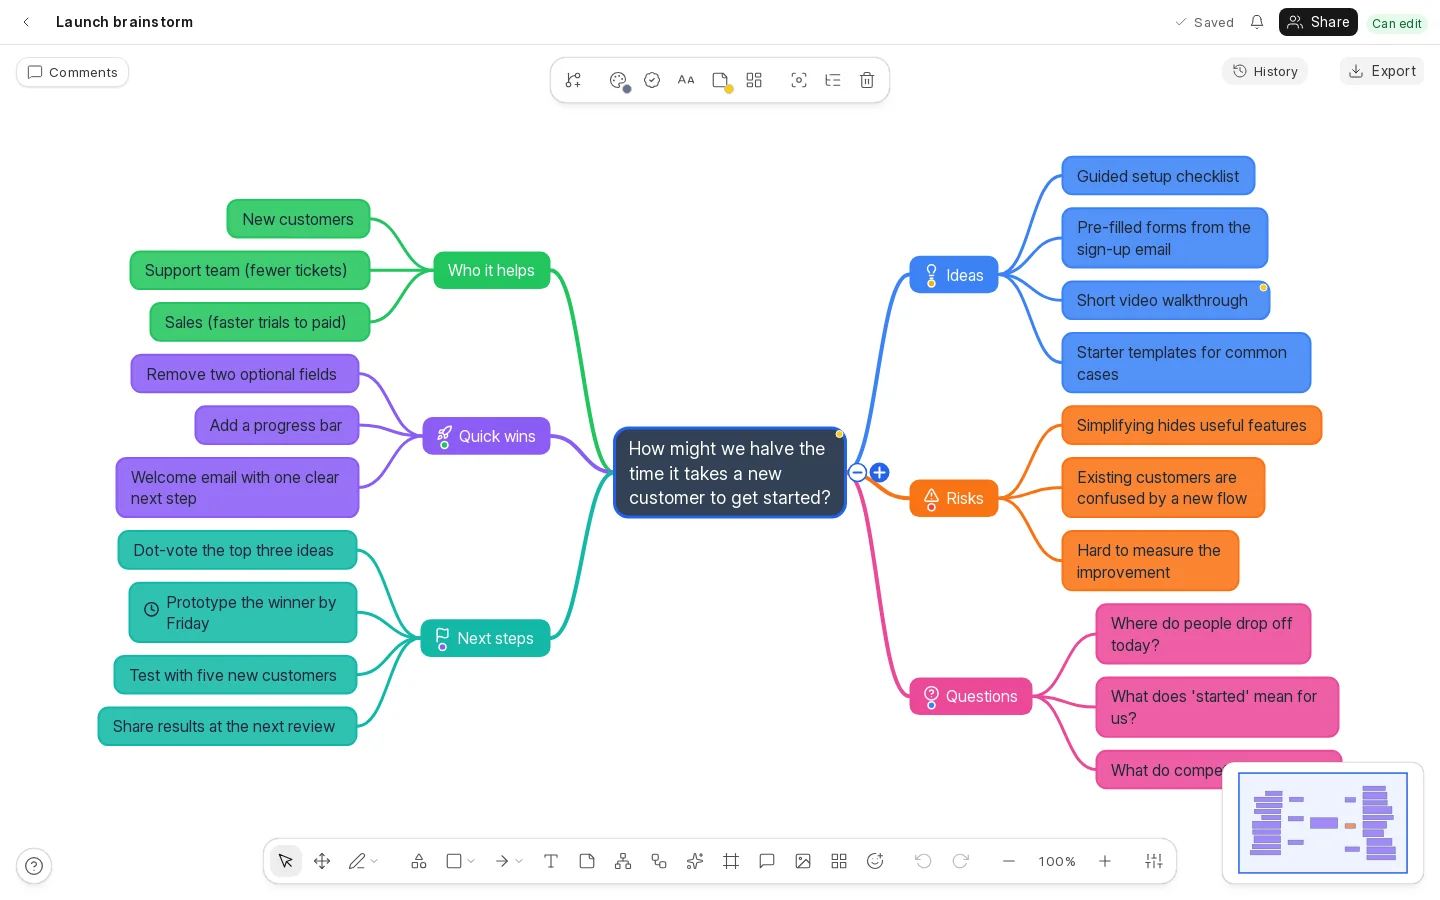
Select a node and the bar changes to the things that matter for a map:

- Add a child Tab. A new branch growing from the selected node.
- Branch colour. Colour for this node and the branch below it.
- Marker. A small icon or coloured dot on the node.
- Text size. Size of the text for this node.
- Note. A longer note kept behind the node.
- Layout. Spread branches left and right of the centre, or all to the right.
- Focus on this branch. Dims everything else so you can concentrate on one branch.
- Outline. Opens the whole map as an indented list you can edit like a document.
- Delete. Removes the node and everything that grows from it.
More you can do
- Drag a node onto another to make it a child of that one, or between siblings to reorder.
- Paste a list. Copy an indented or bulleted list (or one with
#headings) and paste it on the board: it becomes a map. Paste it while a node is selected and it becomes that node’s children. - Cross-links join two branches that are related but not parent and child: select two nodes (hold Shift and click) and the bar offers to link them.
- Press F2 or double-click to edit a node’s text, and Shift + Enter for a new line inside it.
Flowcharts
Flowcharts work like mind maps in one important way: you describe the structure and Oqiva looks after the layout. Steps are joined as you add them, and arrows find their own way round other steps.
Building one
Start
Press Shift + F. You get a Start step and a first step, joined. Type to change the text.
Add steps from the keyboard
Enter adds the next step after the selected one. D adds a decision, T a start or end, I an input or output. With an arrow selected the same keys insert a step in the middle of it.
Or use the plus buttons
Select a step and small plus buttons appear on the sides its arrows can leave from. Click one and choose what kind of step comes next.
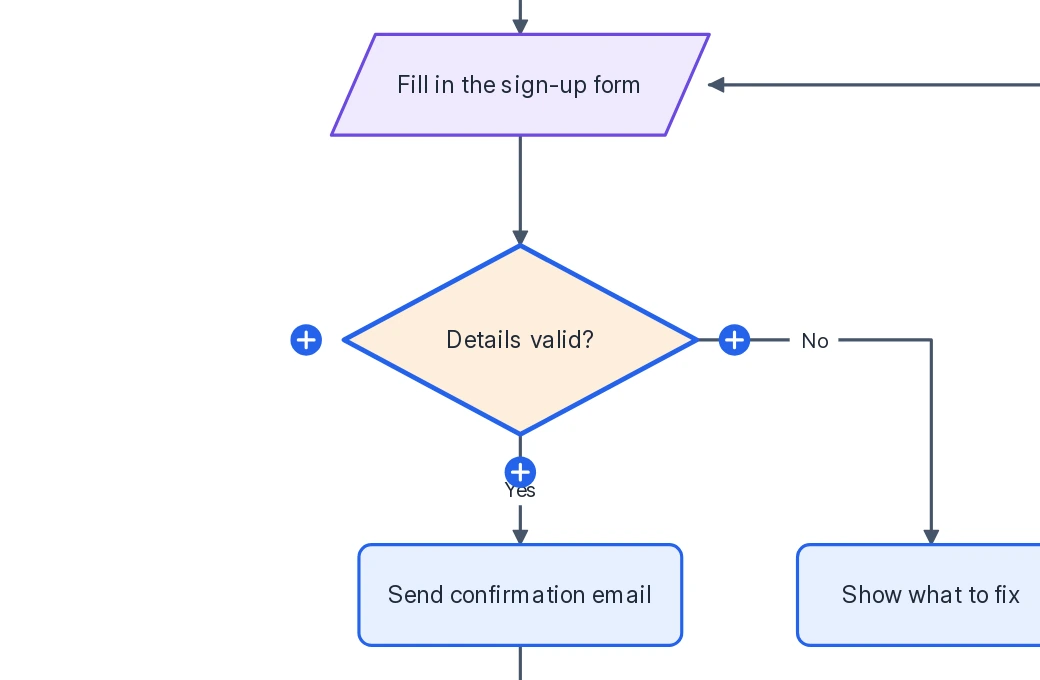
The flowchart bar

- Add next step Enter. A step joined after the selected one.
- Step type. Start or end, process, decision, input or output, or a junction.
- Text size. Size of the text in the step.
- Add another output. For a decision: another branch (Yes, No, Option 3…).
- Edit text F2. Type in the step.
- Tidy up. Lays the whole chart out again in a single undoable step.
- Flow left to right. Turns the chart sideways, or back.
- Number the steps. Shows a number on every step.
- Delete. Removes the step and joins its neighbours up.
Decisions
A decision’s outputs are labelled Yes, No, Option 3 and so on, in the order you add them. Double-click a label to rename it. Add another output gives a decision one more branch.
Tidy up
Drag any step where you want it and Oqiva remembers. When the chart gets untidy, Tidy up lays out everything in one go, and one Ctrl + Z puts it back as it was.
Drawing and the whiteboard tools
For sketching, annotating and pointing, open the Draw menu on the toolbar. The tools can be used alongside shapes and diagrams on the same board.
| Tool | Key | What it does |
|---|---|---|
| Pen | P | Freehand lines. With a stylus that reports pressure, harder presses make thicker strokes. |
| Highlighter | Shift + H | A wide, see-through stroke for marking things. |
| Eraser | E | Either cuts through strokes where you rub, or removes whole objects, depending on its mode. |
| Laser pointer | Shift + L | A glowing dot with a fading trail that everyone on the board sees. It is never saved. |
When a drawing tool is active, a small bar appears at the top of the board:

- Pen colour. Choose the colour of the pen or highlighter.
- Pen width. Type a width, or open the presets next to it.
Each stroke is one object, so you can move, resize, rotate, copy and delete it like anything else. Everything you draw is saved with the board. The Draw menu also has Hand-drawn outlines, which gives every shape and line on the board a sketchy look.
Working together
Everyone who has a board open sees it change as it changes, and nobody has to take turns.
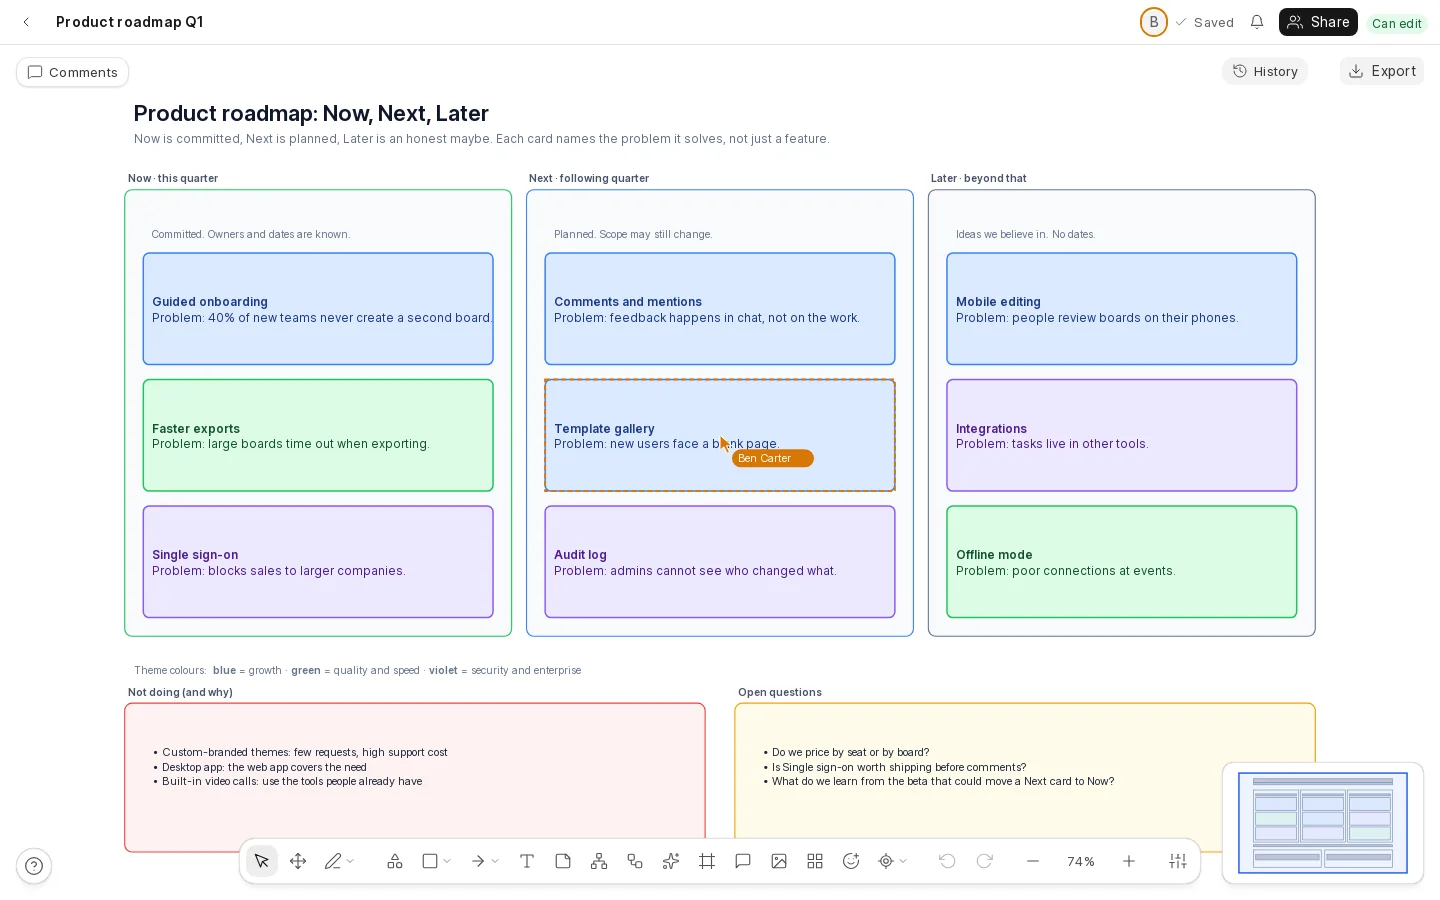
What you see
- Who is here: a round avatar for each other person at the top of the board.
- Their pointer and selection in their own colour, with their name, so you can tell who is editing what.
- Changes as they happen: moves, edits and drawings arrive while the other person is still working.
When two people change the same thing
Edits made at the same time are merged, not overwritten. If you both move the same shape, the last move wins; if you both change different things, you both keep your changes.
If your connection drops
Keep working. The top bar will say you are offline, your changes are kept on your device, and they merge and save when you are back. You will not lose them by closing the tab either: they are still there next time you open the board on that device.
Undo is your own
Ctrl + Z takes back your own last step, never someone else’s. Big actions (a pasted outline, a whole flowchart, an AI diagram, restoring a version) are a single step, so one undo reverses all of it.
Sharing and who can do what
Choose Share at the top right of a board. You can give access to people, or to anyone who has a link.
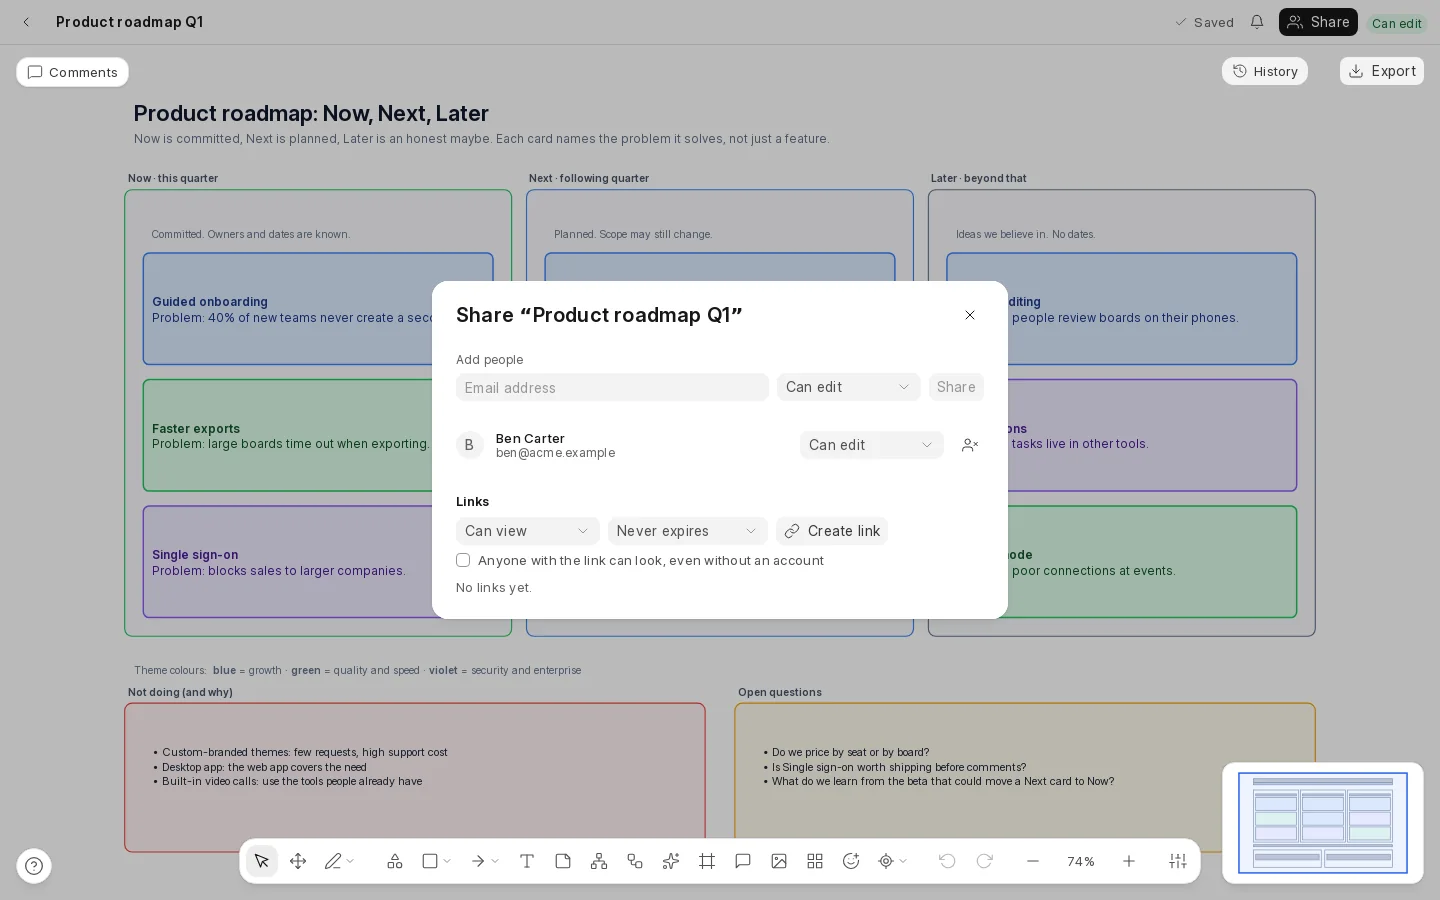
People
Type a name or email address, choose what they may do, and press Share. If they have no account yet, they are invited and get access when they join. Change someone’s level or remove them from the same list at any time. It takes effect at once, even if they have the board open.
| Level | They can |
|---|---|
| Can view | See the board, follow live changes, export it. |
| Can comment | Everything above, and leave and answer comments. |
| Can edit | Everything above, and change the board. |
Sharing a board never gives anyone the right to delete it, move it, or share it onwards. Those stay with the people who run the workspace and the person who made the board.
Links
Choose what the link allows
View, comment or edit, and when it should expire.
Decide who can use it
By default, people need to be signed in. For a view link you can tick Anyone with the link can look, even without an account.
Copy it now
The link is shown once, when you create it. Oqiva keeps only a scrambled form of it, so it cannot show it to you again. If you lose it, make a new one.
You can end any link whenever you like, and it stops working immediately.
Comments and notifications
Talk about the work on the work, so feedback stays attached to what it is about.
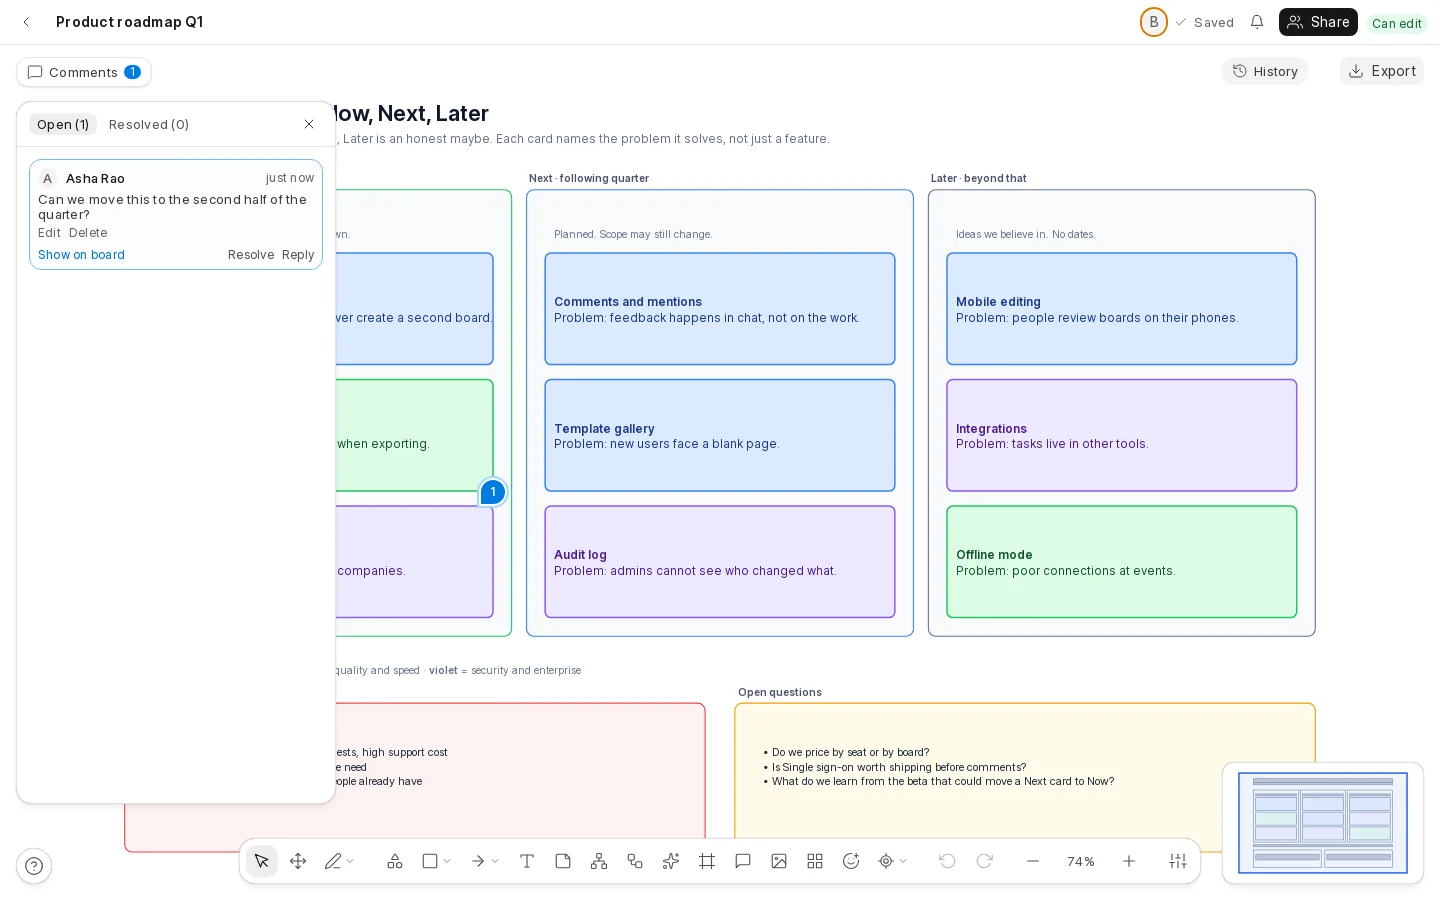
Press C and click
Click a shape to attach the comment to it, or click an empty place on the board.
Write it
Type your comment. Type @ and start a name to mention a teammate from the people on the board. Press Ctrl + Enter or choose Comment to post it.
Follow it up
People reply in the thread. Choose Resolve when it is dealt with, and it moves to the Resolved tab. Open the Comments button at the top left of a board to see every thread, and Show on board to find where one sits.
- A pin follows its shape when the shape moves, and says so if the shape was deleted.
- You can edit or delete your own comments. Workspace admins can delete anyone’s.
- When someone mentions you or replies to you, the bell at the top shows it. The Notifications page in the sidebar keeps the full list, and you can mark everything as read.
Version history
Oqiva keeps versions of every board as you work, so a big change is never a risk.
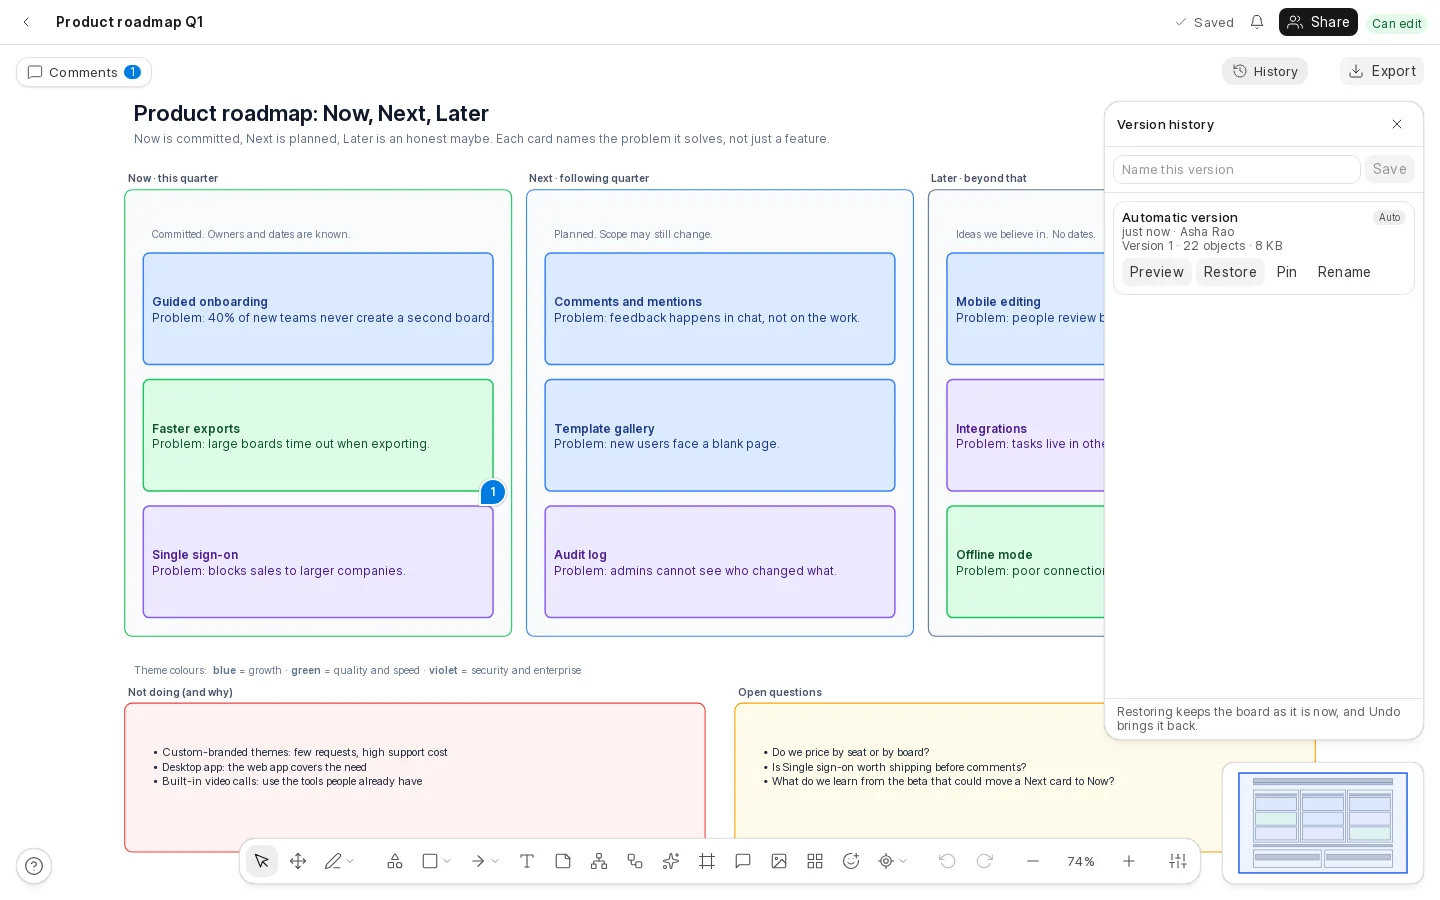
- Automatic versions are saved about every ten minutes while you are changing a board. The newest fifty are kept.
- Named versions: open History, type a name (“Before the re-org”) and press Save. Named versions are kept until you remove them.
- Pin a version to make sure it is never cleaned up.
- Look first: choose a version to see exactly how the board looked, without changing anything.
- Restore: bring that version back. The board as it is now is kept, and restoring is itself a single step you can undo with Ctrl + Z.
Exporting and importing
Choose Export at the top right of a board.
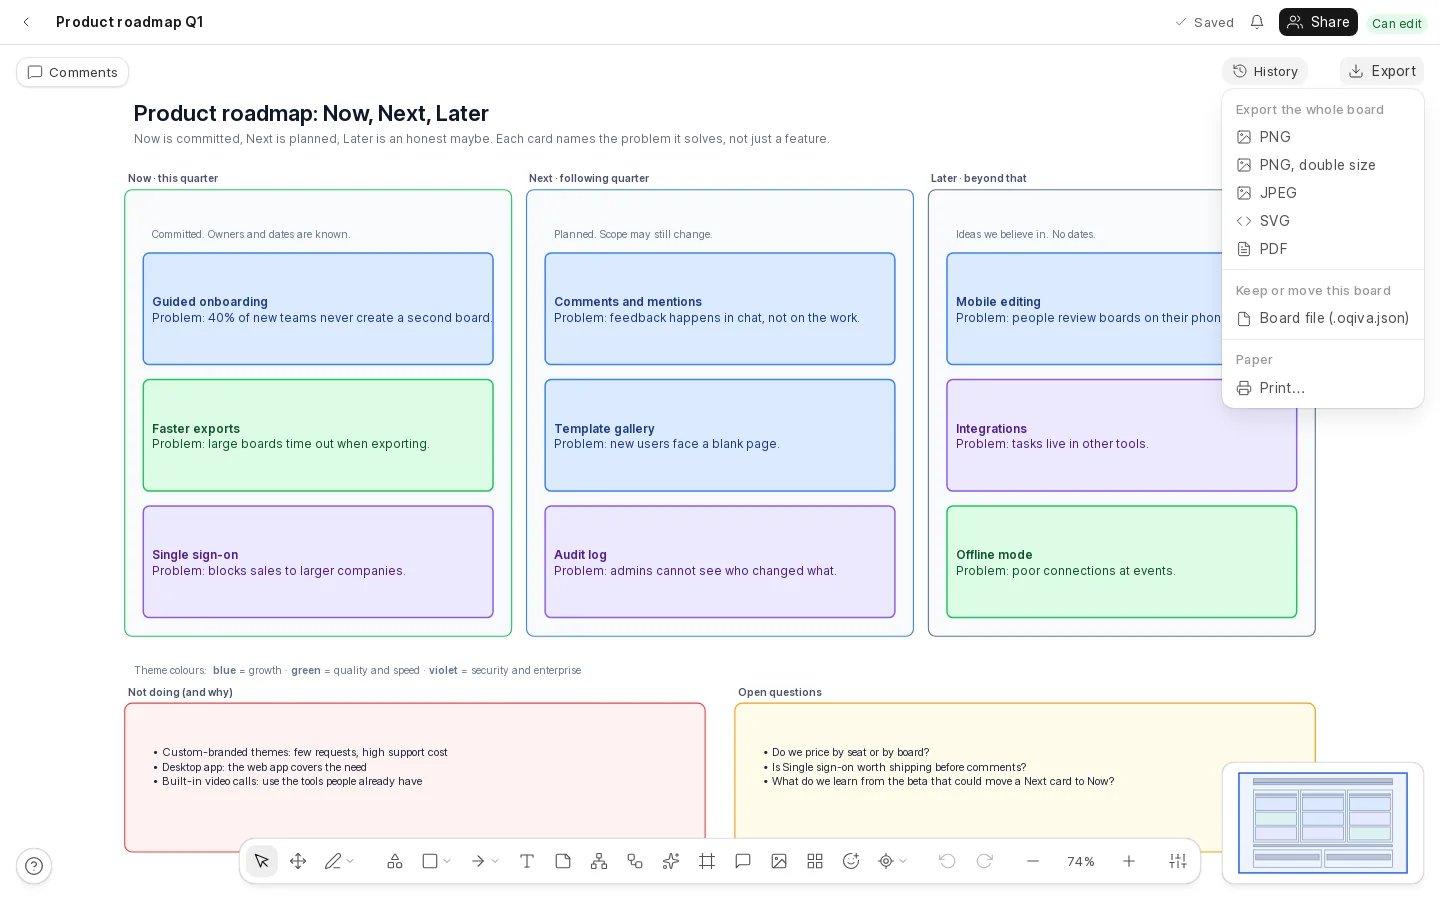
| Choice | Good for |
|---|---|
| PNG, and PNG double size | Dropping a picture of the board into a document or a chat. Transparent where the board has no background. |
| JPEG | Smaller files for email. |
| SVG | Crisp at any size, and editable in a drawing program. |
| Sharing and printing. Page sizes follow the board. | |
| Your browser’s print dialog (Ctrl + P). | |
Board file (.oqiva.json) | Moving a board to another workspace or site. Import it from the home page. Pictures and comments are not included. |
Select some shapes first and the menu also offers Export the selection, which exports only those.
Creating diagrams with AI
If your administrator has turned it on, you can describe a diagram and have it drawn. It is a way to get a first draft quickly, which you then edit like anything else.
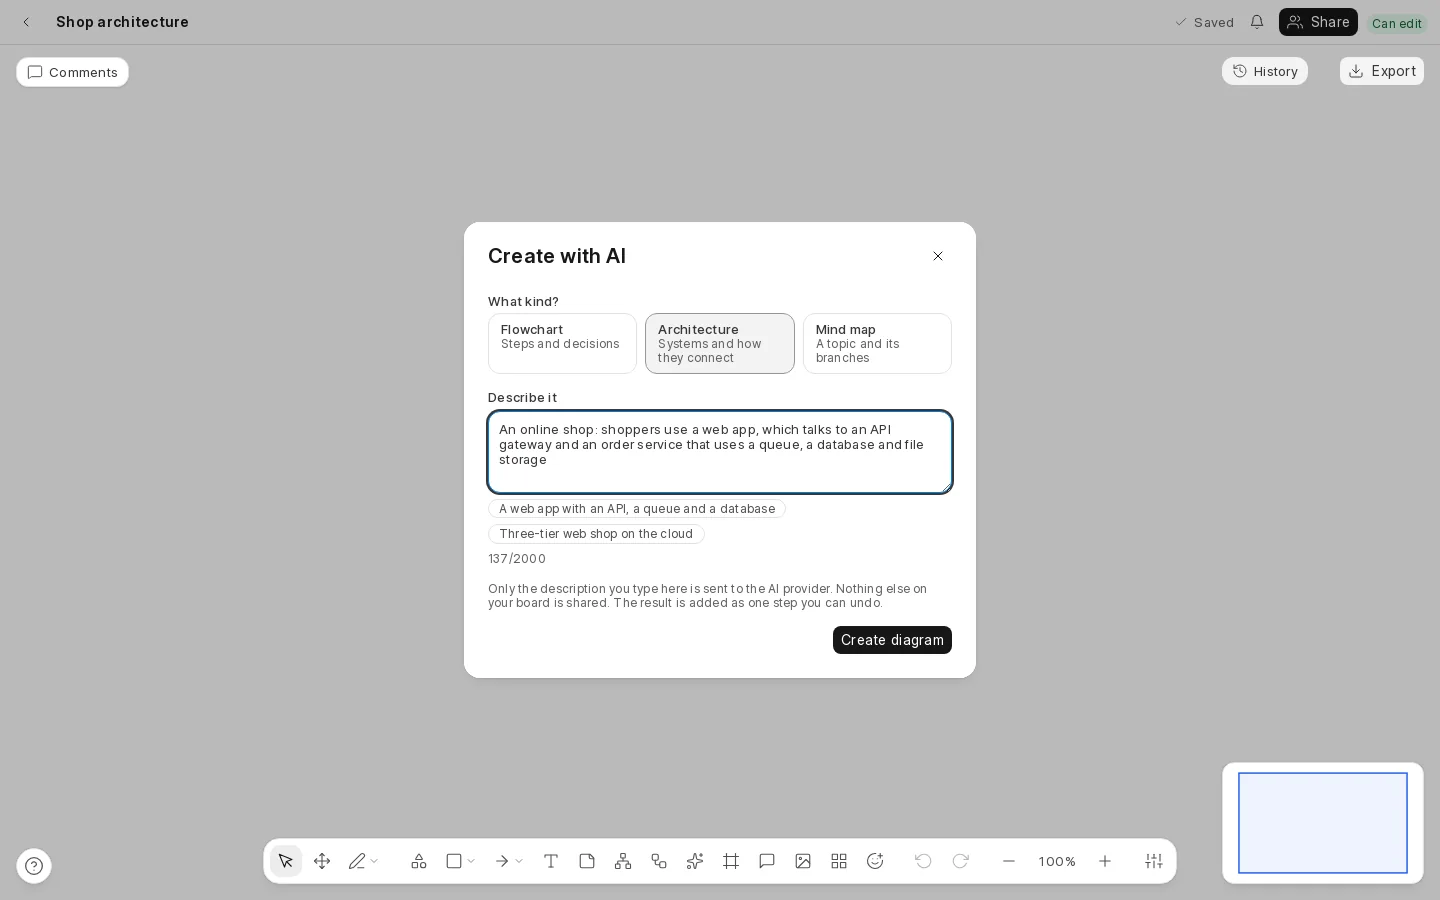
Open it
Choose the sparkles button on the toolbar.
Choose a kind
Flowchart for steps and decisions, Architecture for systems and how they connect, Mind map for a topic and its branches.
Describe it
Write a sentence or two, up to 2,000 characters. Say what the parts are and how they relate. The example buttons show the idea.
Create the diagram
It takes a few seconds. The diagram appears in free space on your board, selected, in one step: Ctrl + Z takes it away.
- An architecture diagram comes as ordinary shapes in named columns for each tier, joined with connectors, so you can edit it like any other shapes.
- A flowchart or mind map is a real one, with all the keyboard commands above.
- If the answer cannot be used, nothing is drawn and you see a message. Try describing it a little differently.
- You can make up to ten requests a minute.
If the button says the feature is not turned on, ask your administrator. They can turn it on in Oqiva Settings.
Keyboard shortcuts
Press ? on any board to see this list. Shortcuts do nothing while you are typing text.
| To do this | Press |
|---|---|
| Undo, redo | Ctrl + Z, Ctrl + Shift + Z |
| Copy, cut, paste, duplicate | Ctrl + C, X, V, D |
| Select all | Ctrl + A |
| Delete the selection | Delete |
| Nudge by 1 (by 10) | Arrow keys (with Shift) |
| Move without snapping | Hold Alt while dragging |
| Select, hand | V, H (or hold Space) |
| Rectangle, ellipse, text, line | R, O, T, L |
| Sticky note, frame, comment | N, F, C |
| Shape library | Shift + S |
| Pen, highlighter, eraser, laser | P, Shift + H, E, Shift + L |
| New mind map, new flowchart | M, Shift + F |
| Mind map: child, sibling, up a level | Tab, Enter, Shift + Tab |
| Mind map: walk, reorder, fold | Arrow keys, Alt + Up/Down, -/+ |
| Flowchart: next step, decision, start or end, input or output | Enter, D, T, I |
| Edit text of the selected step or node | F2 |
| Zoom in, out, to 100% | Ctrl + +, -, 0 |
| Fit everything on screen | Shift + 1 |
| Ctrl + P | |
| Search boards | Ctrl + K |
| Show every shortcut | ? |
When something looks wrong
| You see | What it means, and what to do |
|---|---|
| “This board was changed somewhere else” | Someone saved a different version before you. Reload the page to see theirs. What you were doing is not lost if it was saved on this device. |
| The top bar says you are offline | Keep working. Your changes are kept on your device and sync when the connection returns. |
| A board says you have no access | Your access was removed or the board was deleted. Ask the person who shared it with you. |
| You cannot edit a board | You may have been given view or comment access. The label at the top right of the board says which. Ask the board’s owner to change it. |
| A very big board feels slow | Boards with thousands of shapes are slower when fully zoomed out, and moving everything at once takes a moment. Zoom in, or split the work across boards. |
| “Create with AI” says it is not turned on | Your administrator has not set up an AI provider. Ask them. |
| A picture will not upload | Only PNG, JPEG, GIF and WebP pictures are accepted, up to the size limit your administrator set. |
| A deleted board | Open Trash in the sidebar and choose Restore. Boards stay there for 30 days by default. |
Still stuck? Write to support@oqiva.in with what you were doing, what happened, and your browser, and we will help.
For administrators: installing Oqiva
Oqiva is a Frappe app. You need a Frappe 16 bench with MariaDB and Redis, the bench’s socket server (for live editing) and at least one background worker (for AI diagrams).
cd ~/frappe-bench
bench get-app https://github.com/mohitjosii/Oqiva.git
bench --site your-site install-app oqiva
bench build --app oqiva
bench --site your-site migrate
bench restart
Then open https://your-site/oqiva. The first visit by each person creates their personal workspace.
Settings you may want to change
Open Oqiva Settings in Desk to set the fair-use limits (objects per board, board size, boards per workspace, picture storage), how long the Trash and automatic versions are kept, and whether the Oqiva User role is granted on a person’s first visit.
Turning on AI diagrams
- In Oqiva Settings, choose the provider: Anthropic or Google Gemini.
- Paste the provider’s API key. It is stored encrypted and is never shown to users.
- Leave the model blank for the default, or enter one that belongs to that provider.
- Make sure a background worker is running (
bench startdoes this for development).
Keeping it healthy
Back up with files (bench backup --with-files), because pictures are stored as private files. After every upgrade run bench build --app oqiva, bench migrate, and restart everything, including the socket server.
Frequently asked questions
Do I need to install anything to use Oqiva?
No. People use Oqiva in their web browser, at the address of the site where your organisation installed it. Your administrator does the installation once.
Where are my boards stored?
In your organisation's own Frappe database, on its own server. They are not sent to the Oqiva project or to any other service.
Can several people edit the same board at once?
Yes. You see each other's pointers and changes as they happen, and edits made at the same time are merged rather than overwritten.
What if I lose my connection?
Keep working. Your changes are kept on your device and merged and saved when you are back online.
Which browsers does it support?
Oqiva is built and tested with current Chromium-based browsers such as Chrome and Edge. Firefox and Safari are expected to work but have not been tested yet, so please tell us if you find a problem.
Does the AI feature see my whole board?
No. Only the description you type in the dialog is sent to the AI provider your administrator chose. Nothing else on your board is shared, and the feature is off until an administrator turns it on.
Can I get my work out of Oqiva?
Yes. Export a board as PNG, JPEG, SVG or PDF, print it, or save it as an Oqiva board file that can be imported into any workspace.
How do I get Oqiva for my organisation?
Write to support@oqiva.in and tell us about your setup. If you already run Frappe, installing Oqiva takes a few commands, shown in the installing section of this guide.
Found a gap in this guide?
If something is unclear or missing, tell us at support@oqiva.in and we will improve it.